Saturday, April 30, 2011

Wire Basket Light Fixture and Garage Makeover Update

I found this rusty wire basket at a local floral supply store for $5.00.

I knew it was destined to be a light fixture. I had hoped to change the dated one in my laundry room but today... I discovered this beauty while working on my garage make-over...
I really can't believe I never noticed this light. It must have had a burnt out bulb for years. First, I cut a hole in the bottom of the basket with wire cutters.
Then, I fitted it to the fixture. It was a hair too big, so I wrapped floral wire around the stem until it fit snugly.
This is how it looks finished.

Easy Peasey!!
This was my garage a few days ago. Remember, homeowner neglect??
Today..
Another pic...

Today...

On to the other side!

Tuesday, April 26, 2011

Spring is Here

Today I noticed that my Magnolia Bush had bloomed. I love this bush!

I went to take a few pictures of it and found a girl surfing on a pile of wood in my yard that my personal lumberjack (a.k.a. Walt my neighbor) found and delivered another load of wood.

(Isn't she cute?)
What a nice guy! He came home to have lunch (across the street) and saw that our neighbor had a tree removed. He quickly asked if it was free for the takin, and loaded it up. I am so blessed with wonderful neighbors! Now all I need is a shirtless man a wood splitter to split my wood. Hmmm....Anyway, it was so nice to have a break in the rain and let the kids play outside. I am still waiting to finish my patio. Until then, I will be working on the garage. It is quite the eyesore right now. I scored used kitchen cabinets and have big plans. This is what I am starting with....


I know...I know...homeowner neglect. Just wait and see...it'll be beautiful!!

Monday, April 25, 2011

Ruffled Shower Curtain

I've been eyeing up these shabby ruffled shower curtains for some time. Recently, I found this..

                                              Here
I figured, I can do this. I've just been waiting for the right material. This tutorial calls for 2 king sized flat sheets. I don't have a King sized bed nor do I want to buy those. I happened to find sail cloth table cloths at Marc's for $3.99 each. I bought 4 thinking I would make curtains and a shower curtain. I ended up using 3 50X 84" panels and a old shower curtain for this project. If you want a tutorial, follow the link. I am an avid sewer and found this project very time consuming. Could it be the three kids pecking me to death?!? No wonder the finished product is so expensive. If you make one, DO use a lined shower curtain. Mine is not perfect but is getting rave reviews from the offspring. My daughter thinks it looks like a prom dress. My son agrees and promises not to look under it!! Now..... my bathroom is screaming for a makeover.
I am really liking this shower curtain!

Saturday, April 23, 2011

My Work Station

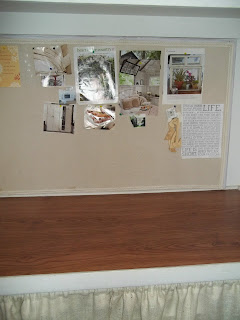
Like so many Moms, I spend a considerable amount of my time in the laundry room. I figured I might as well make the most of it and enjoy the space while I'm there. I took out all of the mismatched odd sized shelves in the reach in closet awhile ago. I built a "folding station" out of a wooden shelving unit and covered the top with leftover laminate flooring that was from my kitchen floor makeover. Recently, I added my inspiration memo board. Stole the cork board from my daughters room and covered it with linen and trimmed it out. Now, when I am standing here folding clothes...I can look at all the projects I dream of doing.


Friday, April 22, 2011

"Mom, Where's my Homework?"


I found this solid wood frame at my favorite second hand store, Second Mile West, for a whopping $1. It has no back or glass. It's been hanging in my hallway for quite some time with a pathetic attempt of a collage that I made. I was browsing Pier One and saw this..

My daughter is in desperate need of some organizational skills. This would be perfect for her to hang her important homework papers. So, I started racking the ol' noggin and came up with this...


I found some vintage chicken wire in the backyard. I was determined to make this with stuff I already had laying around the house and I DID! I also wanted to get through this without needing a tetanus shot. I stapled the wire into place, clipped off the excess and covered with scrap material. When I flipped it over, I discovered that some of the staples poked through the frame. I trimmed it out with leftover trim and hot glue. Now the question is..."Why isn't your homework on your message board?"


Thursday, April 21, 2011

Utterly Amazing!

So, my Dad stopped over to work on the frame of my kitchen window. He loves to mud (a.k.a. drywall compound). He brought these babies over

and asked "Can you use these for something?" OF COURSE I can find a way to utilize these beautiful....holy... boards!?! He explained that he takes pine boards (like these) over to a friend's house for him to "knock out" the knots. Yes, it sounds silly but his friend is an adult with Cerebral Palsy and he has extensive physical limitations. Sounds special ed teacher-ish doesn't it? Any who, his friend spends a great deal of time using his special tools to remove the knots from boards. Up until now, my Dad was unsure how he would make good use of the finished boards. He suggested flower boxes. I think they are unique and I plan to find a good home for my "Holy Boards". I had that Ah...moment. Why don't I use two of them for the sides of my fireplace? The depth is perfect! Just need to cut them down and without molding, they will disguise the one inch difference on either side of my insert. I cut them to size, glued into place with liquid nails and filled and filled and filled those holes! Showed my Dad and he said "Ronny would have an aneurysm if he knew you filled in those holes". He He ...we won't share that with him. Many hours later...after sanding and filling a few times they looked like this....


Not so pretty when you're using scraps.

This is how it looks NOW...


Handsome just HAD to take his place on HIS rug when he saw the camera come out. Off to think about what's next. Lets hope the weather clears up so I can put the finishing touches on my patio.

Absolutely Free Fireplace Redo- My favorite kinda thing

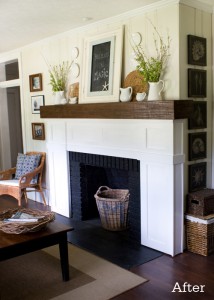
Once in awhile I decide to tackle a project that will be no-cost. I have hated strongly disliked my fireplace mantel for a very long time. I've changed the paint color and shelf several times, never liking the end result. I finally found a "look" I liked. This is my inspiration fireplace. LOVE IT!!
Our Fireplace- After
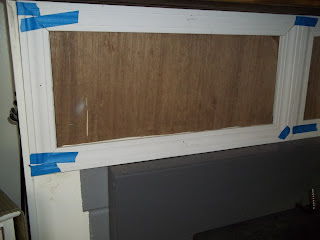
Only difference is that I have a wood burning insert instead and it's staying. My insert is a real workhorse! It gets ALOT of use during the cold months so I was skeptical about painting anything around it WHITE.  I was absolutely determined to use materials that I already have. Sometimes I am just plain stubborn. I kept telling myself...this is cake...you can do this. I have not been too successful cutting angles in the past but...I can do this!  So, I started with the mantel. What do I have in my pile of wood that will be long enough?? I found privacy fence pickets that were left over from last years fence repair job. I am not buying L-brackets to hold these together! Then, I rummaged through some curtain hardware and found L-shaped-ish mounting brackets. Simply made a box, sanded with my palm sander, stained it and mounted it on the existing decorative wood brackets (after cutting those down to slip inside the box). Easy peasey! Now, how do I replicate that molding? Quarter-round... old picture frames?? Ah... door molding! I got to work with the miter saw. I decided to scale back the molding because there is a one inch difference on either side of the insert. Maybe less...will be more? Oh, I also used liquid nails to adhere underlayment behind the molding because there was a sandstone trim going around the metal cover that I wanted to eliminate. In order to level the backing I used wood shims. Blah...blah...blah. Project is moving along...

          Can't wait to figure out what to do on the sides! Decisions...decisions.

Tuesday, April 19, 2011

"Stone Soup" Patio


Ok, I've been a big CHICKEN about posting on my blog. I spent way too much time worrying about the layout and what I would say. I have been doing this project/decorating thing for a very long time. I purchased my house 10 years ago now and can't tell you how many things I've done. I'm going to just jump in and show you a project I've been thinking about for awhile. I worked on it last Friday and I am almost done.
Last Fall I envisioned a small sitting area for myself in my front flower bed. I really need a place to sit while the kids are playing outside. I've resided to the one step on the porch for years. I always groan when they want to play out front. We have a great fenced-in backyard but they always want to play out front! So, in the fall, I transplanted my perenials from in front of the window to the backyard. A few weeks ago I stopped by my favorite second hand furniture store and found the best chippy white wrought iron furniture. I got 4 chairs, one cafe table, an end table, and 4 cushions for a whoppin $38!! Score! The same day my friend Jonelle stopped over. I excitedly told her about my new patio set and my plans for a small patio. She said " I have 500 or so bricks in my garage you can have". No Way! I only need good weather to install " The Pad". This is before I leveled the area and transplanted the holly bush. Check back to see the finished "Pad"!